
There’s something about the holidays that calls for a dessert that feels both effortless and unforgettable. That’s exactly where this apple tart shines. It’s the kind of treat that looks stunning on the table with its golden, glossy apples and buttery crust, yet comes together with far fewer steps than a traditional apple pie. It’s rustic, elegant, and quietly impressive… the kind of dessert people assume took hours but you know came together in just a few simple folds.
This apple tart has become one of my go-to holiday desserts, especially when the kitchen is already buzzing with mashed potatoes, stuffing, roasts, and rolls. When I need something that delivers that warm, cinnamon-kissed flavor without adding stress to the day, this is the recipe I reach for. Serve it warm with a scoop of vanilla ice cream, or room temperature with a dusting of powdered sugar, it never disappoints.
And in our house, it’s become more than just a holiday dessert, it’s a little tradition. My son loves all things apples, and this tart is his absolute favorite. If he had it his way, he’d eat it for breakfast, lunch, and dinner all year round. So, when I pull this out of the oven, warm and bubbly, I know I’m guaranteed at least one very happy kid.
Crust Ingredients
If you don’t have time to make your own crust, that’s ok. This tart tastes great with a store bought, ready to bake pie crust. If you want to try your hands at your own crust, this easy recipe comes together in minutes.
- 1¼ cups all-purpose flour
- 1 tablespoon sugar
- ½ teaspoon salt
- ½ cup cold unsalted butter, cut into small cubes
- 3–4 tablespoons ice water
Crust Recipe
- Combine Dry Ingredients
In a food processor, add the flour, sugar, and salt. Pulse to mix. - Add Butter
Add the cold, cubed butter to the processor. Pulse until the mixture forms course, crumbly pieces. - Add Ice Water
Drizzle in 3 tablespoons of ice water and pulse again.
If the dough still looks dry, add the final tablespoon.
Pulse until the dough just begins to come together, don’t over mix. - Form the Dough
Turn the mixture onto a clean surface. Gather it into a ball, then gently flatten into a disk. - Chill
Wrap the disk tightly in plastic wrap. Refrigerate for 30 minutes. If you are short on time, 10 minutes in the freezer will also work. - Roll Out
Once chilled, unwrap and roll out the dough on a lightly floured surface for your pie recipe. You want it between ¼ inch to 1/8 inch thick and approximately 12 to 13 inches in diameter. - Place your rolled out crust onto a foil lined cookie sheet. It helps to lightly roll the crust around your rolling pin to help transfer it from your counter surface to the cookie sheet. If you get any cracks simply pinch them closed.
Note:
Don’t worry if you don’t have a food processor, you can prepare this crust by hand using a pastry cutter or a couple of butter knives to cut the butter into the flour mixture.
Tart Ingredients
- 5 apples, peeled cored and evenly sliced (Granny Smith, Gala or Honey Crisp, or a combination of all three)
- ½ cup light brown sugar
- ½ lemon, juiced
- 1 teaspoon ground cinnamon
- 1 teaspoon vanilla extract
- Pinch of salt
- 1 teaspoon granulated sugar
- 2 tablespoons unsalted butter cut into small cubes
- Salted caramel sauce (optional)
Tart Recipe
- Preheat the oven to 350 degrees.
- In a large bowl toss the sliced apples until well coated with the light brown sugar, lemon juice, ground cinnamon, vanilla extract and pinch of salt.
- Your crust should be prepared and ready on a foil lined cookie sheet. (see crust recipe above) Sprinkle a little bit of flour on the rolled out pie crust. This will help keep your crust from getting soggy.
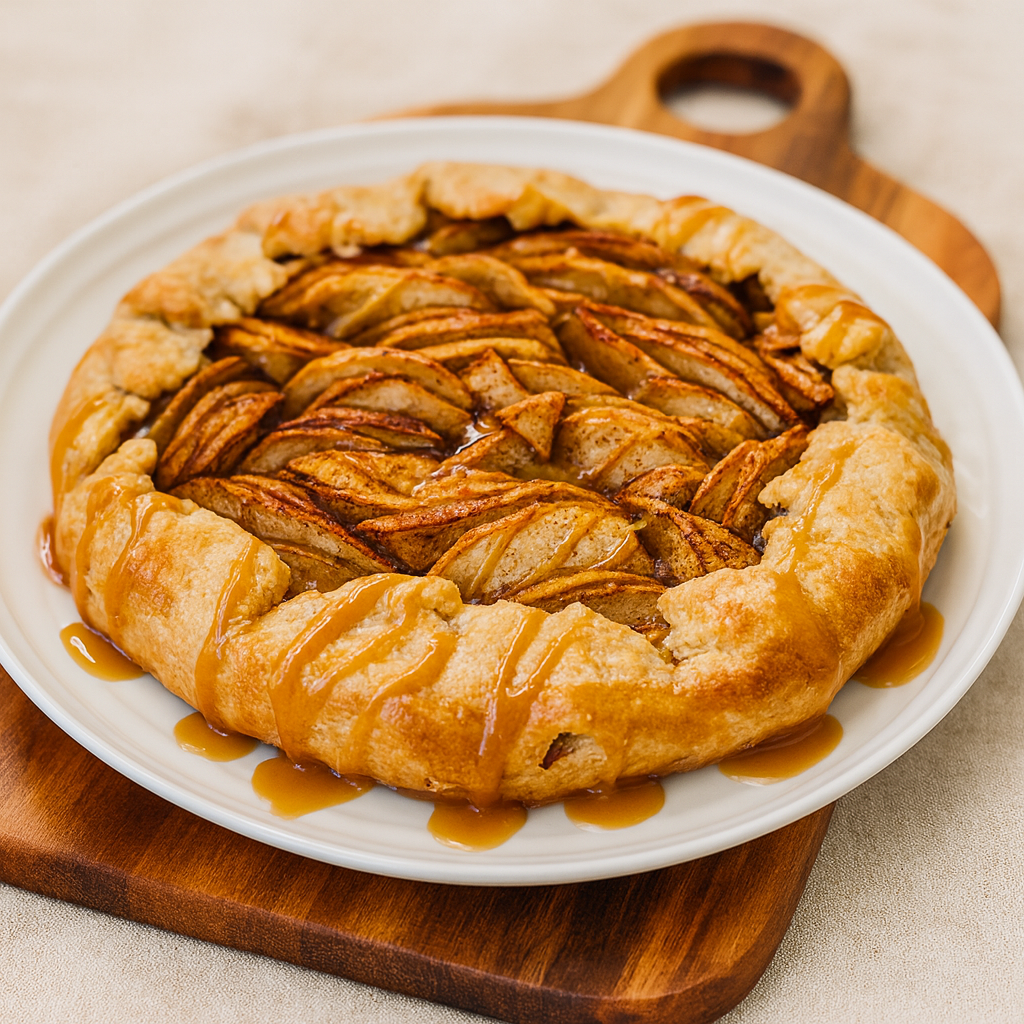
- Arrange the sliced apples on the rolled out pie crust in bunches, tightly packed, leaving about a 2 inch border around the edge. Do not dump the whole bowl of apples onto your crust as the juice that collects at the bottom of the bowl will make your crust soggy.
- Once you have all your apples tightly packed onto your crust, start to fold over the crust. As you bring a section up, it will overlap slightly on the previous section. Keep going around until the whole crust is folded over onto the apple filling.
- Sprinkle the apples with the granulated sugar. If you prefer a sweeter tart you can add a little extra sugar.
- Place the cubed butter on top of the apples, evenly spaced out along the top.
- An optional step: brush the crust with a little egg wash to give it that extra golden glow.
- Before placing the tart in the over, lift up the edges of the foil around the tart. Do not cover the crust to tightly.
- Place the tart in the oven and bake for 1 hour.
Finishing Touches
Once the tart comes out of the oven let it cool slightly before transferring it to a plate for serving.
Finish it with a drizzle of salted caramel if you like.
This tart is best served warm, so pop it in the microwave for a minute before slicing and plating. Add a scoop of your favorite ice cream and you’re ready to dig into this delicious cozy dessert!
Why You’ll Love This Tart
- It’s easy. No complicated lattice, just a simple easy crust. Just assemble, bake, and enjoy.
- It tastes like the holidays. Apples, cinnamon, butter, and a little sugar… simple ingredients but pure cozy magic.
- It’s crowd-pleasing. This tart slices beautifully for a dessert table and pairs perfectly with coffee after dinner.
- It looks gorgeous. The thinly layered apples create a bakery-style presentation with very little effort.

Leave a comment